Friday, December 24, 2021

2021 Favorites - Make Your Own DSP

This post is going to be very busy!  I made SO many of these "Make your own DSP" cards.  I still want to make more, but I just have other things that need to get done!

How do you make your own DSP?  You need a stamp set that can make backgrounds.  It should have lots of elements to make a scene or grouping.  Use ink colors that work with your stamps.

For example, for these cards I used:  Crumb Cake and Early Espresso for the pinecones and Evening Evergreen and Soft Succulent for the pine needles.  I used either the browns or some Real Red for the dots.

Read down a little further - there's a special technique.
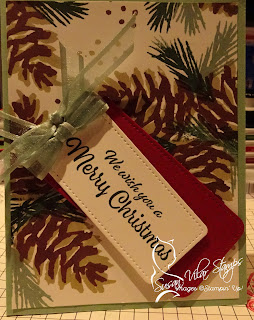


These two cards were made using the Split Card technique.  Cut your background twice as long as a card base: 10.5 inches.  Draw a very light pencil line vertically at 5 1/4 inches.  Concentrate your stamping to cover the line at the center of the card.  When finished, cut the card at 5 1/4 inches, and you have two cards!

I added a lot of other stamping to fill the space - I just kept going!  


Click on any of the products below to purchase materials to make this project.

If you don't currently have a Stampin' Up! Demonstrator, I'd be thrilled to talk with you about furthering your crafting pursuits!


Product List

Wednesday, December 22, 2021

A Few 2021 Christmas Cards

Life gets in the way is about all I can about my lack of posts from last June.  

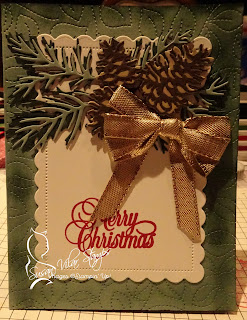
That being said, here are a selection of my favorite Christmas Cards using the Pinecone Dies.  They're incredibly intricate, but EASY to use!  They make beautiful card fronts and as you can see can be cut up to make 3 additional cards.

Here you can see the greetings die from Pretty Pillowbox and my favorite Merry Christmas stamp.  For this piece I used bronze cardstock and some patterned paper on the top.  It gave a really beautiful effect.

Here are the three cards I made with the cut pinecone dies.  Each is embellished in its own way.  One uses the whimsy dies, one uses the contour dies, and is embossed. 


Click on any of the products below to purchase materials to make this project.

If you don't currently have a Stampin' Up! Demonstrator, I'd be thrilled to talk with you about furthering your crafting pursuits!

Product List


Wednesday, June 23, 2021

It's a Super Cube Deluxe!

Disclaimer:  This card took me about 7 hours to complete.  Yes, 7 hours.  NO, the next one will not take me as long!  I was following directions and figuring out what looked best.  That always takes time!

Next Disclaimer:  I LOVED making it!  It was a lot of fun watching this creation take shape and every time I added something it got better.

After making the previous cube card, I knew I could tackle this one.

This deluxe card does take some specific adhesives.  I used Tear and Tape & Liquid Tombow Mono Glue for construction and my tape runner for the mats and DSP pieces.

Here is the view of the right-hand side (above) and the left side (below).

Initially this was going to be a birthday card (the next one will be), but I found out I needed a Get-Well card for a very special person!

I think this one requires a video.  Stay tuned!  *All the measurements are online, and I'll provide them with the recording.


Click on any of the products below to purchase materials to make this project.

If you don't currently have a Stampin' Up! Demonstrator, I'd be thrilled to talk with you about furthering your crafting pursuits!

Product List


Wednesday, June 16, 2021

It's a Cube Card!

I've looked at these Cube cards repeatedly.  I thought, "They'd be great for club cards!"  I am blessed with advanced crafters.  They help me stretch my crafting because I like to try new skills (techniques) and these are quite impressive.

The card itself is easy to put together. 

Here you can see much of the Pansy Suite.  I used the DSP, stamps, and dies to decorate each side of this very cute birthday card.

We used a lot of colors to stamp the pansies!

Purple pansy:  Gorgeous Grape, Fresh Freesia, Daffodil Delight, Basic Black
Yellow pansy:  Daffodil Delight, Daffodil Delight (off 1x), Gorgeous Grape, and Basic Black.

I die-cut the leaves in Garden Green with a Mint Macaron top for contrast.

DIRECTIONS:

To make this card:  Score a piece of 8 1/2x11 cardstock on the  short side at 2", 4", 6", and 8".  Turn the cardstock so you are cutting across the score lines, and cut one piece at 4 inches, and two pieces at 2 inches.  You're going to have a 3 inch piece left over.  Save it for another project.

On the 1/2 inch score piece, miter your corners so they don't show.  Adhere all pieces together as cubes with adhesive on the 1/2 inch piece.

Attach small cubes to the larger piece with Liquid Tombow Mono glue.

Decorate per your style!


Click on any of the products below to purchase materials to make this project.

If you don't currently have a Stampin' Up! Demonstrator, I'd be thrilled to talk with you about furthering your crafting pursuits!

Product List