Showing posts with label Die Cuts-Layering Squares. Show all posts

Monday, July 23, 2018

Christmas in July - July 23, 2018


 I'm featuring two greens on this card because ivy greens are much darker and shinier than evergreen needles. 
The stamp set is still a favorite of mine called Watercolor Winter.  I've made many cards from it over the years.  This is an updated version with new dies and a new technique.

 I used the Stitched Die to cut out a piece from the base and used my Stamparatus to stamp all of the holly and berries pieces.  I used the Shaded Spruce and Cherry Cobbler markers to color then stamp the holly pieces.
 The evergreen needles were stamped in Garden Green randomly to cover the background.  I cut a piece of real red from the layering dies to frame the holly and berries.

The new stamp set Around the Corner is featured on the inside of the card. 
This set of six cards is very special!  There are now 100 cards for July so far!  We'll have to see how many I end up with by the 31st.
100 Christmas Cards in July.


Click on any of the products below to purchase materials to make this project.

If you don't currently have a Stampin' Up! Demonstrator, I'd be thrilled to talk with you about furthering your crafting pursuits!


Tuesday, July 3, 2018

Christmas in July - July 3, 2018


 First the plain, then the BLING!

I'm using a current stamp set today!  It wasn't intended to be a Christmas stamp at all.  It's the sunflower stamp from Painted Harvest! 

I initially stamped the wreath on the cardstock and decided it was WAY too boring so I got out my stitched dies and cut it.  I then cut a red frame with a scalloped edge. 
As I took the picture, I still needed to add the bow.  I made it from red/white striped twine and placed it at the bottom of the wreath.
As I said yesterday, I LOVE Shaded Spruce!  I used it here to make the wreath.  The first layer is stamped off, and the second layer to give dimension is stamped full strength with the ink.  I love that dimensional look.

 Around the Corner shows up again for the inside of the card along with a retired sentiment set called Versatile Christmas.


Here's the bling!  I still wasn't finished with the Painted Harvest wreaths, and wanted to try another color combination.   On this card, the wreath was stamped first with Granny Apple Green, then stamped with Shaded Spruce over it.  On each little set of berries, I added a very small rhinestone. 
I also added some multi-colored rhinestones to give the sentiment some sparkle as well.  Each star at the top got a treatment with Wink of Stella for even more shine.

I also made 7 of these Christmas cards because after the original six, I wanted to try the other color combination.  I believe one of these will be one of my club cards.  Just sayin'.


Click on any of the products below to purchase materials to make this project.

If you don't currently have a Stampin' Up! Demonstrator, I'd be thrilled to talk with you about furthering your crafting pursuits!


Tuesday, January 30, 2018

Stampin' Up! Layering Shapes - Stitched, Ovals, Circles and Squares - A Project

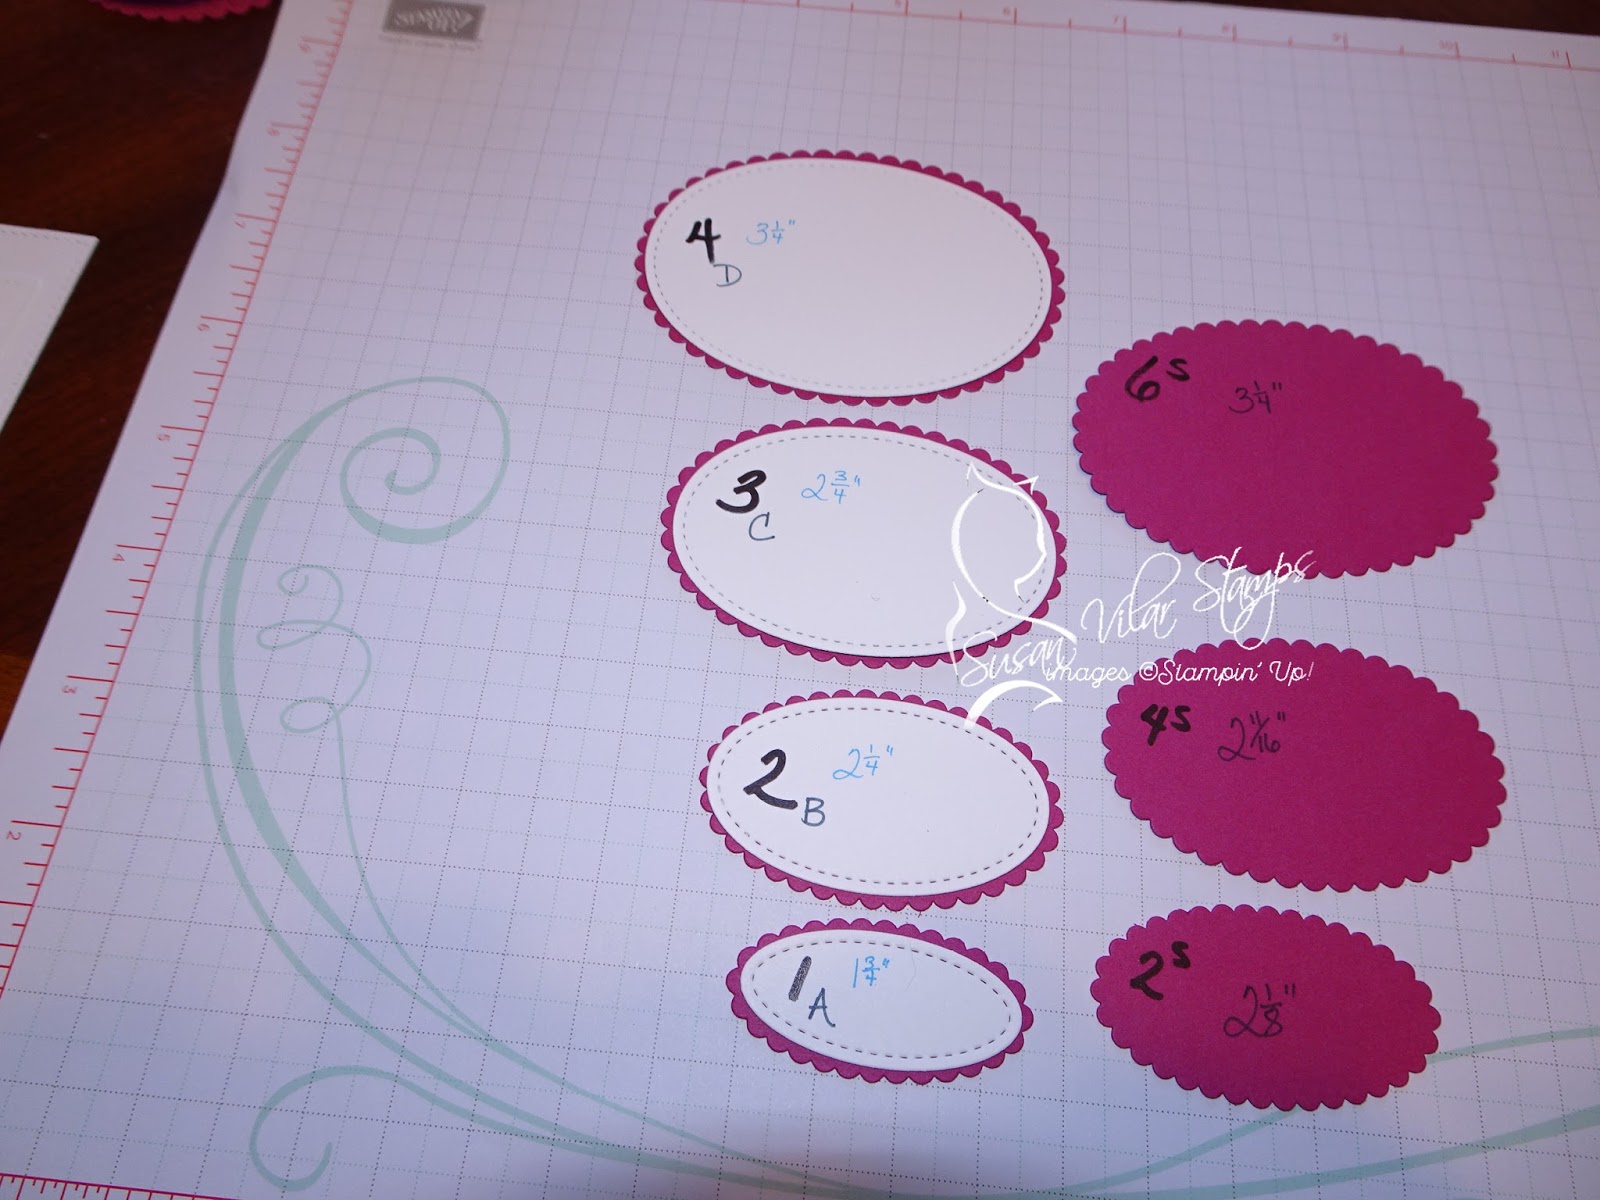
I had an idea.  There are so many Layering Ovals, Layering Circles and Layering Square dies, and just a few Stitched Shapes Dies.

 Then there are the Stitched Shapes.

 I wanted a quick way to know which dies worked together in layers.  It's absolutely frustrating when you're working with a sentiment and can't find or aren't sure about which shape is the right fit to make a nice border.

I solved that problem!  Here is my project.

 Pictured below are the ways to layer the Stitched Shapes on the Layering Dies.
 Each set of scalloped or smooth Layering Ovals, Circles, and Squares is numbered, and the size is written on them.  Click on the pictures to see them more clearly.
 The Stitched Shapes have a number, letter, and measurement.  Pay attention to the letters here. 
 I realized I only took pictures of the Layering Scalloped Circles, but included the smooth circles in the word document.
 Here you can see the scalloped Layering Squares, and below are the smooth Layering Squares.
I hope my little project helps you in making easier choices when choosing dies.

Leave your email address in the comments, and I will email you the document with the explanation and additional layering solutions for all these dies.


Click on any of the products below to purchase materials to make this project.

If you don't currently have a Stampin' Up! Demonstrator, I'd be thrilled to talk with you about furthering your crafting pursuits!


Monday, October 30, 2017

Merry Patterns Inspiration

This card was inspired by another demonstrator names BJ Peters.  She used Lemon Lime Twist as her base color.  Since that color is NOT a favorite, I changed it out for Emerald Envy.

The Cherry Cobbler and Emerald Envy together are really great - as you can see. 

After stamping the flames, I added Wink of Stella to make them sparkle.  I colored the jewels to match the stamping with Sharpies.


Click on any of the products below to purchase materials to make this project.

If you don't currently have a Stampin' Up! Demonstrator, I'd be thrilled to talk with you about furthering your crafting pursuits!