Showing posts with label Embossing Folder. Show all posts

Sunday, January 16, 2022

January 2022 Stamp Club Cards Post 1 of 2

Our first Stamp Club meeting was yesterday.  As always, we had a great time!  I've also introduced a challenge card this year.  More on that later.

First, one of the cards the ladies chose to make during club this year.  I had so many choices for our Christmas Stamp-A-Stack there just wasn't enough time.  This card uses Misty Moonlight on Vanilla cardstock.  You can't see the sparkle, but the snow is highlighted with Wink of Stella.  

This stamp set/bundle is called Flowering Rain Boots.  There were a few stamps in this new catalog I knew I needed, and I love these rain boots!  Wellies aren't part of the American culture very much, but they are very British!  I find it absolutely adorable that the boots can be flower planters!  How cute is that?
We embossed the background and added some ink to bring up the design.  The tulips are stamped in Bumblebee and Gorgeous Grape ink.  I cut the second set of leaves and stems and tulips apart to have some for the inside of the card.
Did you notice the pebbles?  What a great detail!
You'll notice there's no greeting on this card.  It could be a birthday card for a gardener, it could be a Thank you card, or even a Thinking of You card. There is enough space to add any greeting you'd like!
Here they are!  Just that little surprise when you open the card.


Click on any of the products below to purchase materials to make this project.

If you don't currently have a Stampin' Up! Demonstrator, I'd be thrilled to talk with you about furthering your crafting pursuits!
Product List


Wednesday, December 22, 2021

A Few 2021 Christmas Cards

Life gets in the way is about all I can about my lack of posts from last June.  

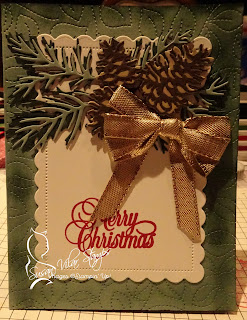
That being said, here are a selection of my favorite Christmas Cards using the Pinecone Dies.  They're incredibly intricate, but EASY to use!  They make beautiful card fronts and as you can see can be cut up to make 3 additional cards.

Here you can see the greetings die from Pretty Pillowbox and my favorite Merry Christmas stamp.  For this piece I used bronze cardstock and some patterned paper on the top.  It gave a really beautiful effect.

Here are the three cards I made with the cut pinecone dies.  Each is embellished in its own way.  One uses the whimsy dies, one uses the contour dies, and is embossed. 


Click on any of the products below to purchase materials to make this project.

If you don't currently have a Stampin' Up! Demonstrator, I'd be thrilled to talk with you about furthering your crafting pursuits!

Product List


Tuesday, May 25, 2021

A Special Technique

The first card was featured at one of my club events.  I wanted the background to stand out, so we die cut a two-step stamped flower and placed it so you could see the background.

THIS card.  When I saw this technique - WOW!    When I first saw this card it looked like the butterflies were inlaid on the background.  They're not.  Each butterfly is popped on top of the colored background with dimensionals. 

This technique uses blender brushes!  I made a stencil from this single-die cut that cuts out all six of these butterflies, then layered Calypso Coral, So Saffron, and Daffodil Delight with a swirling motion so each butterfly had a bit of each color. 

The greeting comes from the Many Messages stamp/die cuts.


Click on any of the products below to purchase materials to make this project.

If you don't currently have a Stampin' Up! Demonstrator, I'd be thrilled to talk with you about furthering your crafting pursuits!

Product List