Showing posts with label Tips. Show all posts

Saturday, June 6, 2020

Stampin' Up! RGB and Hex Codes for the In-Colors 2020-2022


It's already a few days after we can start using and ordering the new In-Colors 2020 - 2022
Searching online, I couldn't find any documents that had the RGB codes for our new (really beautiful) In Colors!  SO, I got into my Photoshop program, and extracted them myself.

Please feel free to download the file, but please don't remove my makers mark at the bottom.  It took me quite awhile to figure out how to convert the numbers.  All we got from Stampin' Up! were the Hex codes.

Click on the photo to take a look.  Click HERE to download a .pdf file that's clean.

Below you can see the new cardstock colors and ink pads.  Click on the link to order!


Click on any of the products below to purchase materials to make this project.
Product List

If you don't currently have a Stampin' Up! Demonstrator, I'd be thrilled to talk with you about furthering your crafting pursuits!


Tuesday, January 30, 2018

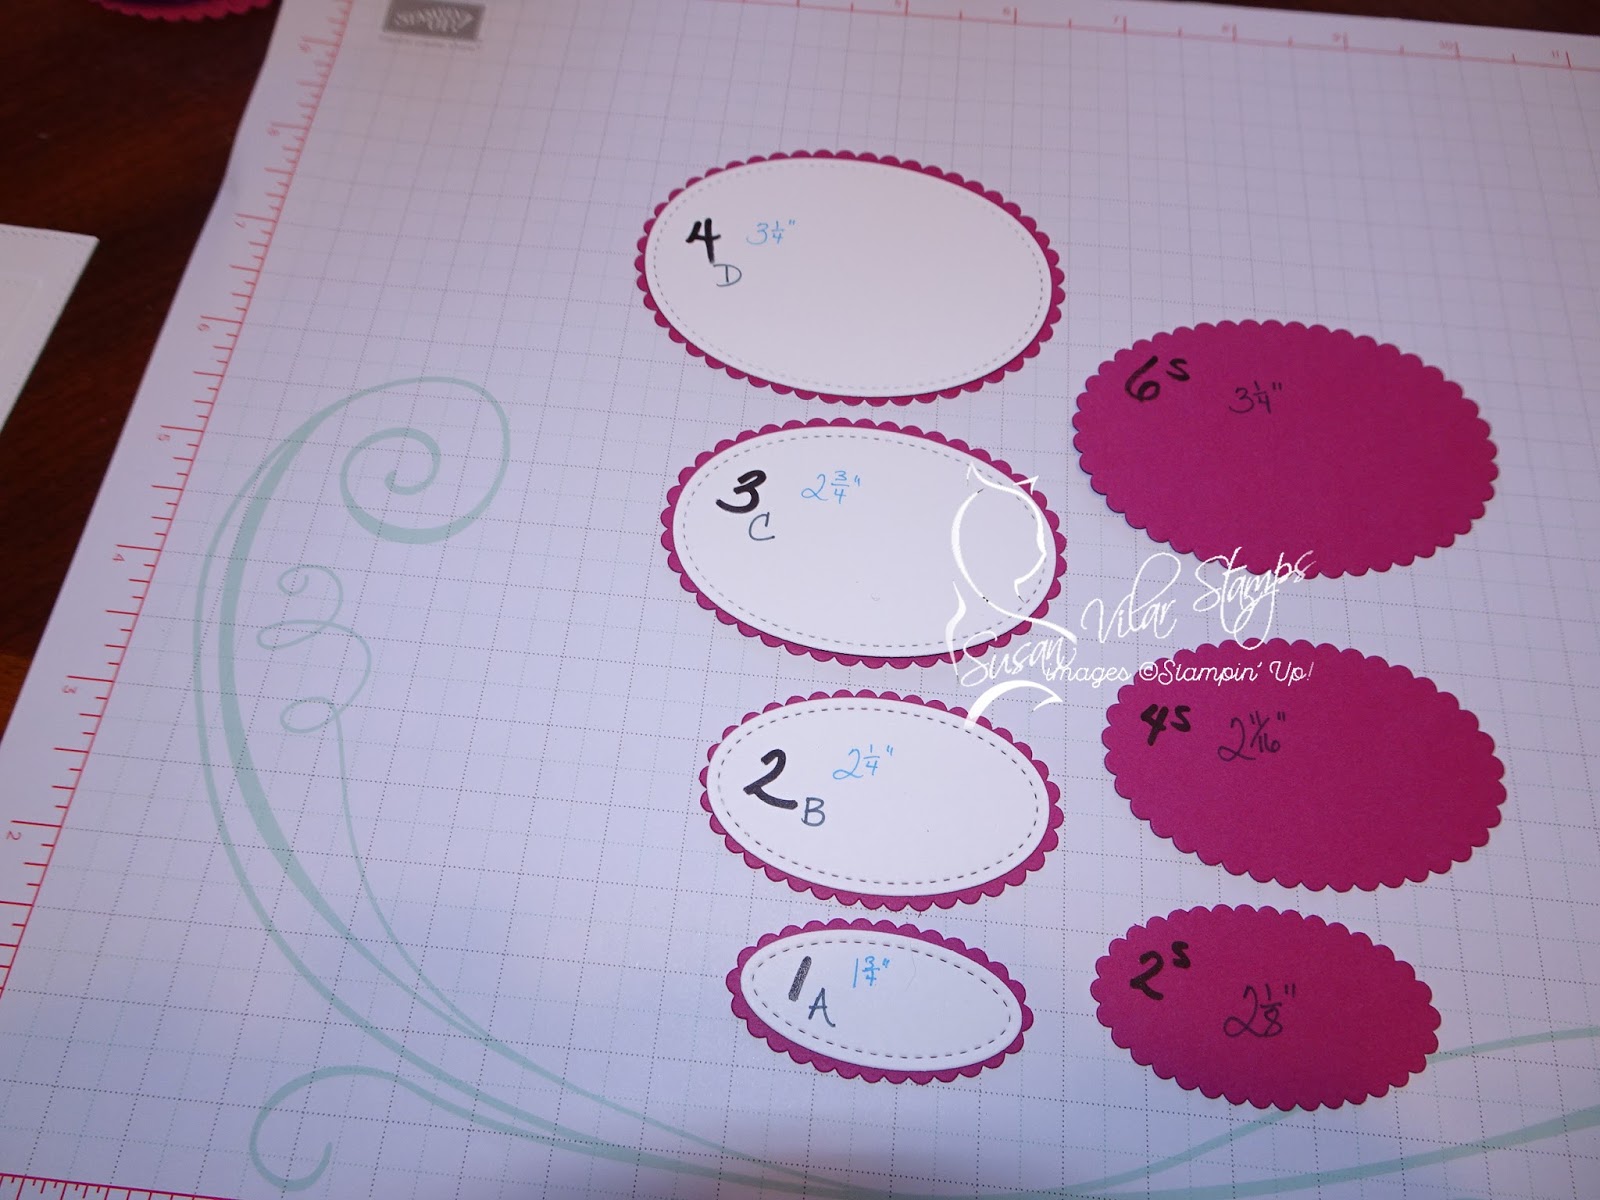
Stampin' Up! Layering Shapes - Stitched, Ovals, Circles and Squares - A Project

I had an idea.  There are so many Layering Ovals, Layering Circles and Layering Square dies, and just a few Stitched Shapes Dies.

 Then there are the Stitched Shapes.

 I wanted a quick way to know which dies worked together in layers.  It's absolutely frustrating when you're working with a sentiment and can't find or aren't sure about which shape is the right fit to make a nice border.

I solved that problem!  Here is my project.

 Pictured below are the ways to layer the Stitched Shapes on the Layering Dies.
 Each set of scalloped or smooth Layering Ovals, Circles, and Squares is numbered, and the size is written on them.  Click on the pictures to see them more clearly.
 The Stitched Shapes have a number, letter, and measurement.  Pay attention to the letters here. 
 I realized I only took pictures of the Layering Scalloped Circles, but included the smooth circles in the word document.
 Here you can see the scalloped Layering Squares, and below are the smooth Layering Squares.
I hope my little project helps you in making easier choices when choosing dies.

Leave your email address in the comments, and I will email you the document with the explanation and additional layering solutions for all these dies.


Click on any of the products below to purchase materials to make this project.

If you don't currently have a Stampin' Up! Demonstrator, I'd be thrilled to talk with you about furthering your crafting pursuits!


Saturday, March 11, 2017

Tip: Storing your Metal Dies

 I cannot take credit for this idea, but I surely use it!!  Robin Smith lent me a set of dies so I could try them before I bought them... and she had her dies stored like this.  It didn't take long for me to do this with ALL of mine!  I've shared the idea with all of my customers, and now I hope you love this as much as I do!

What an awesome, AWESOME way to store your magnetic dies!
 The magnetic material are VENT COVERS!  Can you believe it?  They have just enough magnetic "stick" to keep the dies in place in the folders without being so strong that you can't get them off the backing.
 Another benefit?  You can cut them with a guillotine cutter, and I estimate I can use one package of vent covers for a total of 5 to 6 die sets.
 This has been a revolutionary discovery for me!  No dies on that sticky tape.... Ugh!  I really hated that.  Also, no dies hanging out in the bottom of the folder, getting tangled and difficult to sort when you want to use them.
 You can find them in the painting area of Wal-mart, Lowes, or anyplace that sells painting or hardware supplies.  Make sure they say magnetic!  

THANKS so much to my friend and fellow demonstrator, Robin Smith, for this spectacular idea!!!!  She's the BEST!


Click on any of the products below to purchase materials to make this project. If you don't currently have a Stampin' Up! Demonstrator, I'd be thrilled to talk with you about furthering your crafting pursuits!

Sunday, November 6, 2016

October Stamp Club's Bonus Card in 2 Variations

Just before our Stamp Club in October, I decided to make one more card.  The image comes directly from a stamp set used at the September club, and even though it was just before Halloween at the time, I decided to use it anyway.

 I thought these little mummies were SO cute!  You'll notice each card has the same elements... I just changed up things between the two.  I like those variations.  That way you can choose which you like better, and go with that. 
This is like that game where there are two pictures, and you have to find the differences... except I'm going to tell you the answers.  Whew! 

The mummies are stamped in black, then one is sponge dauber'd in Crumb Cake ink, and the other is sponged in with Smoky Slate.  The spider web in the top card comes from the same stamp set as the cheese cloth and chicken wire stamps.

I've mastered the trick for dealing with linen thread or metallic thread behind stamped elements!  You may have noticed that I used a lot of the metallic thread on many of the Christmas Tags. 

TIP:  On the back of your figure, attach dimensionals.  I used 3 on the back of the mummies for this project.  Take a 'good' length of twine or thread.  Attach one end right to the dimensional.  Give a gentle twist to make a loop, and press the thread to the dimensional, with the loop showing off to the side.  Follow this, working the thread so it lays the way you'd like... gentle loops, or straight loops, etc.
Attach your figure to your card.  No need for more dimensionals, and the thread/linen is 'locked' in on your card!

The mummy cards, I left the thread ends hanging off the ends for a different effect.


Click on any of the products below to purchase materials to make this project. If you don't currently have a Stampin' Up! Demonstrator, I'd be thrilled to talk with you about furthering your crafting pursuits!