Tuesday, January 30, 2018

Stampin' Up! Layering Shapes - Stitched, Ovals, Circles and Squares - A Project

I had an idea.  There are so many Layering Ovals, Layering Circles and Layering Square dies, and just a few Stitched Shapes Dies.

 Then there are the Stitched Shapes.

 I wanted a quick way to know which dies worked together in layers.  It's absolutely frustrating when you're working with a sentiment and can't find or aren't sure about which shape is the right fit to make a nice border.

I solved that problem!  Here is my project.

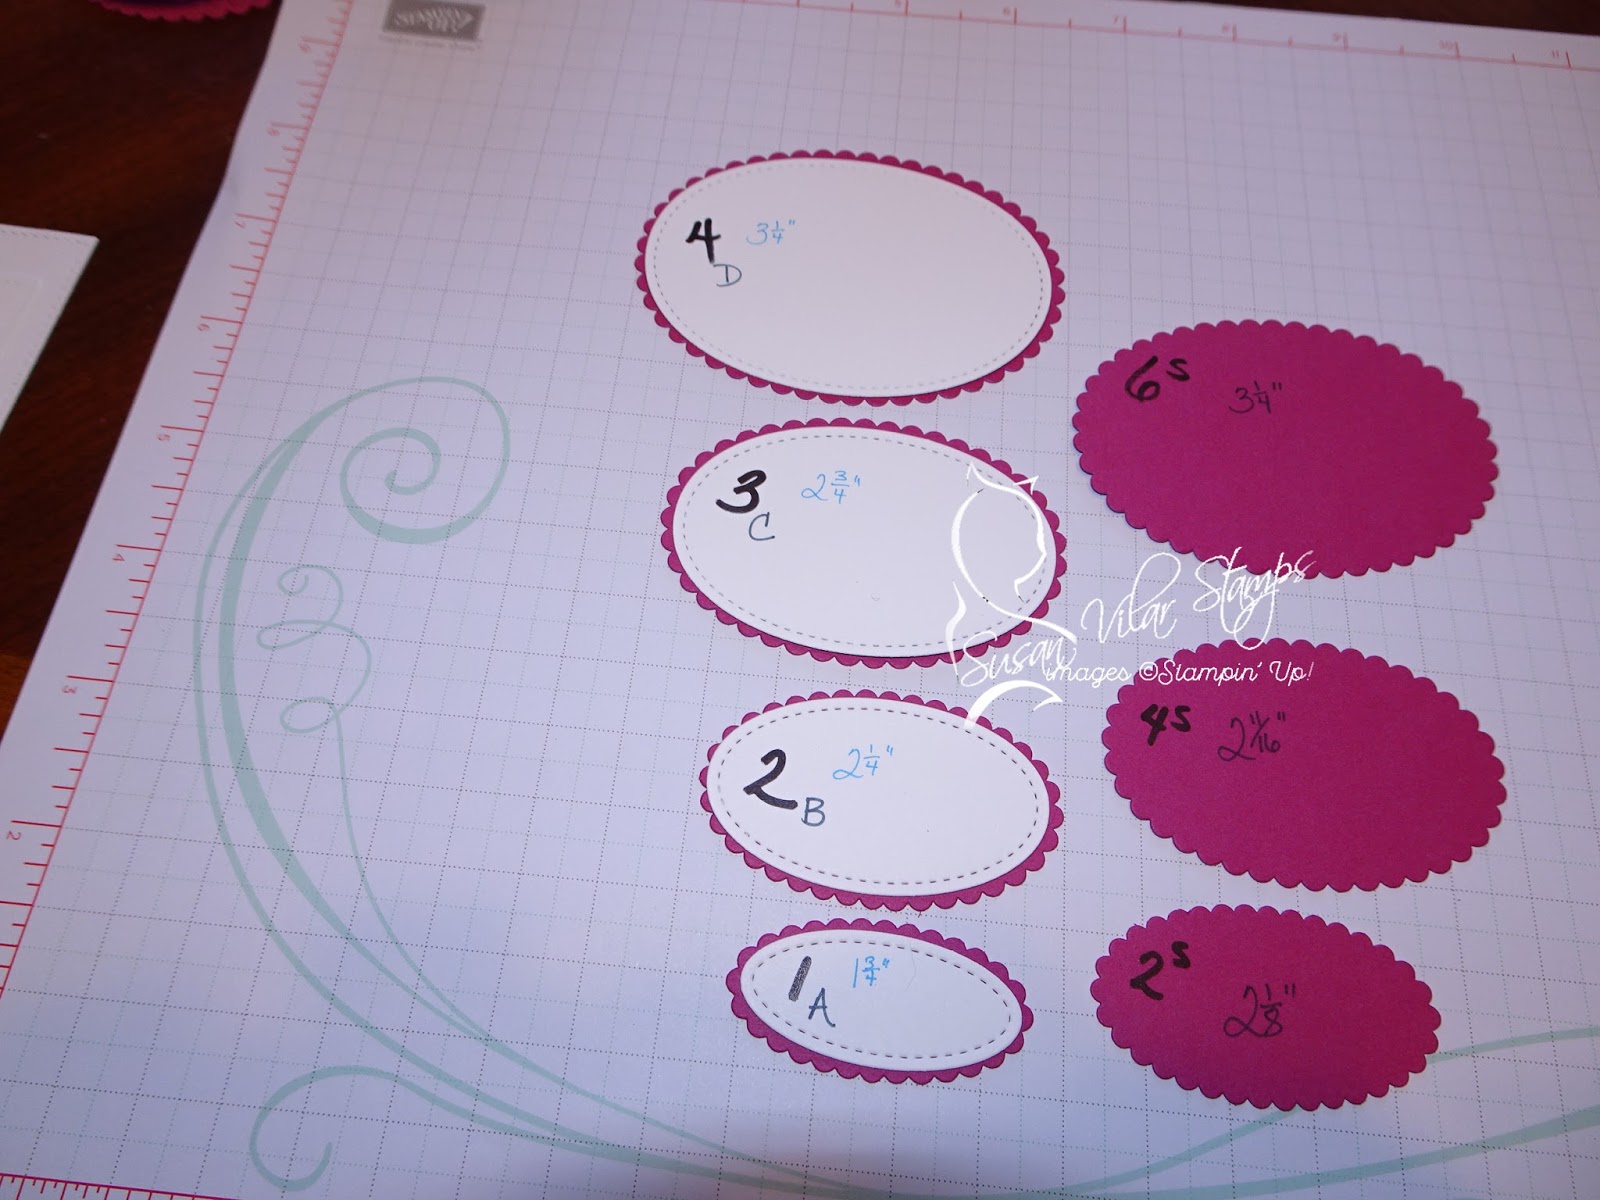
 Pictured below are the ways to layer the Stitched Shapes on the Layering Dies.
 Each set of scalloped or smooth Layering Ovals, Circles, and Squares is numbered, and the size is written on them.  Click on the pictures to see them more clearly.
 The Stitched Shapes have a number, letter, and measurement.  Pay attention to the letters here. 
 I realized I only took pictures of the Layering Scalloped Circles, but included the smooth circles in the word document.
 Here you can see the scalloped Layering Squares, and below are the smooth Layering Squares.
I hope my little project helps you in making easier choices when choosing dies.

Leave your email address in the comments, and I will email you the document with the explanation and additional layering solutions for all these dies.


Click on any of the products below to purchase materials to make this project.

If you don't currently have a Stampin' Up! Demonstrator, I'd be thrilled to talk with you about furthering your crafting pursuits!


Thursday, January 25, 2018

Valentine Event with a Helper!

As we do throughout the year, my upline Kathy and another fellow demonstrator Robin and I get together to present events.

Our first even this year is for Valentine's Day.  I decided to do some searching to find treat holders.  One of my cards didn't go over so well last year and I wanted (needed) to make a change.  Lots of the people I know give treats more often than cards - and Valentine's Day is perfect for treat giving.
 I found this video on making the Ferrero Rocher mini coffee cup holders.  I really love the Ferrero Rocher! 
These can be made from any patterned paper.  Thicker paper will require more sturdy adhesive.  On the green flowered version, I just used a regular tape runner.

My next treat holder features my helper!  I actually redesigned this treat holder from a version I'm presenting for Mother's Day.  The treat inside is a lip gloss!  For our event, I went and got all the flavored gloss. {Fun!}

 Introducing... my Panda helper!  I took the pictures of these projects pretty quickly, and Sandy was hanging around.  He's a good kitty, but not very cuddly. 

I just happened to catch him checking out the lip gloss.  Lucky shot!


Now for the card I'm presenting.  It's a very easy design and can be used for much more than Valentine's Day.  Tell the people you love that you love them.  Always and often.

I used Rich Razzleberry cardstock as my background, and gold foil paper with the Large Letter Thinlits.  I hope you can get the true feeling of this card.  It's stunning.  The paper has gold foil accents.

There he is again.  Softest kitty ever, and I do love him!  My Panda helper.

This is the first time I've used an entire pack of Designer Series Paper.  Yes, I have another pack since I ordered two, but I find it pretty exciting!  I used an entire pack of DSP for one event.  YAY!


Click on any of the products below to purchase materials to make this project.

If you don't currently have a Stampin' Up! Demonstrator, I'd be thrilled to talk with you about furthering your crafting pursuits!


Tuesday, January 23, 2018

2018 Calendars! January and March

I do LOVE the Large Number dies!  Sure, I've used them for a workshop, but I use them for much more than that!  They've now made appearances on last year's and this year's calendars, a club project, and Dad's birthday invitations... among other things.  So useful!!

The snowflakes for January are cut from Bermuda Bay glimmer paper, and Dazzling Diamonds glimmer paper.
If you've every tried cutting glimmer paper with the big shot, you know it's NOT easy!
I found a way to make it much easier!  On the back of any Stampin' Up! glitter/glimmer paper, there's a backing sheet and clear film.  Very carefully from one corner peel off this backing paper.  The glitter paper remaining will run through your die cutter with EASE!

The March calendar features the Tranquil Tulips Hostess set.  It's a 2-step stamping set, and you can make tulips absolutely any color you'd like!
Here I chose Blushing Bride, Daffodil Delight, and Tempting Turquoise.

Mom, after a trip to the Netherlands planted bulbs she had shipped from the market there in a berm at the house.  There were tulips everywhere, and it just about every color.  A pretty, very delicate looking flower.


Click on any of the products below to purchase materials to make this project.

If you don't currently have a Stampin' Up! Demonstrator, I'd be thrilled to talk with you about furthering your crafting pursuits!


Sunday, January 21, 2018

2018 Calendars! April and May

 I really enjoy the Climbing Orchids stamp set!  No, I didn't think I would - but it has turned out to be a favorite.

I like the flowers stamped and cut in 3 parts and put together with dimensionals.  They look more like the real thing - and I think they don't look real anyway.  At first, I thought those flowers were fake! 

I am presenting a project at my friend Zandra's art studio Celebrat!ions Stud!o in March using this stamp set.  It's a framed piece.

Mom's a quilter, so when I saw this stamp set in the Holiday catalog, I knew I had to make something out of those quilt pieces!  We did this as a very specific paper piecing project.  I precut all the white backing pieces, and the black outlines.
We each worked on one quilt piece at a time. I die cut 2 sets of patterned paper, and worked in opposing areas. I took the outside pieces, and Mom glued the interior pieces.  Making 16 of these didn't actually take all that long - it was just some intense paper-piecing.

I then used crumb cake paper, silver glimmer sheets, and some twine to make the thread pieces. 


Click on any of the products below to purchase materials to make this project.

If you don't currently have a Stampin' Up! Demonstrator, I'd be thrilled to talk with you about furthering your crafting pursuits!


Thursday, January 18, 2018

2018 Calendars! June, August and September


 Each of these calendar months are heavily decorated with Stampin' Up! items, past and present.

My dad has always been a pretty handy guy.  Anything that needs to be fixed, just let him know, and it will be done - and done well.  Very well.  When Mom and I were working on June's calendar page, we called him over to help with placement of the tools.  :) 

The watercolored pieces here are Stampin' Up! stamps from the Occasions 2017 catalog.  As soon as I saw them, I knew they'd be perfect for August!  It's always so difficult to find themes since August doesn't have any holidays. 
I stamped and heat embossed the pieces in white on watercolor paper, and used my Jane Davenport watercolors to add color to the pieces.  My friend Kathy lent me one of her Stampin' Wheels for the background.  Thank you, Kathy!

The bicycle is a current Stampin' Up! set.  It's got lots of pieces, and many stamping levels....  One day, I'm going to make those wheels spin!


Click on any of the products below to purchase materials to make this project.

If you don't currently have a Stampin' Up! Demonstrator, I'd be thrilled to talk with you about furthering your crafting pursuits!


Tuesday, January 16, 2018

2018 Calendars October and November

Here are two examples of my 2018 calendars.  Why is December missing?  It doesn't have any Stampin' Up! stamping on it - only some specialty cardstock as part of the layout.

For October, I had to use Spooky Cat!  This was a fantastic stamp set available until January, 2018.  It had so many elements in it - and I'm not that much of a Halloween fan.
 I used a technique that's all the rage right now - the Eclipse technique.  Stamp one or more images on a piece of cardstock.  Use the Large Letters dies to cut out your word, and then cut black letters (2 or 3) to give some definition to the letters.
 I've seen this Eclipse technique used with names, and sentiments.  It can be used for just about anything! 

November features a paper pumpkin shaker card.  It was Mom's idea to use for this calendar, so I ordered enough sets and cut them down to fit the calendar base.  It turned out better than we both expected!

Here you can see a close-up of the shaker with the sequins behind the leaves. 


Click on any of the products below to purchase materials to make this project.

If you don't currently have a Stampin' Up! Demonstrator, I'd be thrilled to talk with you about furthering your crafting pursuits!


Monday, January 15, 2018

The Missing January Club Card

Here it is!
This card features the roses stamp from the current Stampin' Up! Occasions catalog in the Petals Palette stamp set.  There are also die cuts that work with this set.  My focus for today's Thank You card was to keep it simple and clean.

I had the ladies use Real Red, and Emerald Envy with the Aquapainters - I demonstrated how to get the variation in color using just one ink pad to add color to the flowers and leaves.

The stamp Thank You comes from the set One Big Meaning.  It's a favorite of mine. 


Click on any of the products below to purchase materials to make this project.

If you don't currently have a Stampin' Up! Demonstrator, I'd be thrilled to talk with you about furthering your crafting pursuits!


Saturday, January 13, 2018

2018 Card Club - January

Today is our FIRST meeting of our Card Club for 2018.  We're adding two new members today!  It's very exciting!  The more the merrier!

This year, we meet the 2nd Saturday of each alternating month.  I've told the ladies we will make at LEAST 3 cards - one Happy Birthday card, one Thank You card, and one Christmas card.  As usual, I already have one bonus card planned.  These are usually very quick to make.

Here is our Happy Birthday card.  I'm teaching a technique using the Large Letter framelits.  The color choice is totally yours - pick a theme!  I used other colors and letters with this for Rozella's birthday card a few posts ago.
 Here is our Christmas card for today.  This card also has lots of options!  It doesn't have to be a Christmas card.  Just switch out the DSP and base colors.  Add a different sentiment and you've got a fantastic card for any occasion!
  Here's our bonus card.  I used my new toy the Scan and Cut 2 to cut the Panda.  That stamp set is in our Sale-A-Bration catalog.  I believe these are going to go FAST!  They will sell out quickly.  If you think they're cute... don't wait!

I have one card coming to show you.  I'm waiting on stamp set.  I HATE it when I lose stamp sets.  When it arrives, I'll complete the card and post it. 


Click on any of the products below to purchase materials to make this project.

If you don't currently have a Stampin' Up! Demonstrator, I'd be thrilled to talk with you about furthering your crafting pursuits!